Useful information
What is the best way to learn how to repair gadgets? — a practical article with explanations and recommendations for technicians, service centers, and users. It highlights the main points to consider when choosing, using, or repairing devices.
The most reliable way to learn phone repair combines three things: theory from good sources, practice on spare or scrap devices, and feedback from someone with real bench experience. Start with safe disassembly and basic measurements, write down the result of every exercise, and move to the next stage only once you can repeat the task successfully several times in a row. A customer's phone is not a practice device.
This article first went up in November 2023 as a short comparison between teaching yourself and doing an internship at a repair shop. We rewrote it in October 2026: the core idea stayed, and we added a staged practice plan, clear pass criteria and pointers to reliable repair documentation.
Choosing how to learn
| Format | Strength | Limitation | Best used for |
|---|
| Self-study | Your own pace, lots of free material | Hard to spot your own mistakes | Theory, terminology, rehearsing procedures |
| Structured course | A logical syllabus, graded exercises | Quality depends on the syllabus and the instructor | Foundations and practical assessments |
| Repair shop internship | Instant correction, real customer work | Schedule and type of jobs depend on the shop | Bench technique, how a job flows through a shop |
| Combined route | Theory is checked in practice straight away | Needs a plan and a progress log | Systematic learning from simple to complex |
For most beginners the combined route gets results faster: learn theory and procedures at home, practise on your own or scrap phones, and once a week show your work to a technician who can tell you what you are doing wrong.
How to vet a phone repair course before you pay
- The syllabus is split into modules, and each module has hands-on exercises with a result that can be checked.
- Students work on practice boards and devices, and each person gets real bench time instead of only watching a demonstration.
- The instructor works or has worked in a repair shop and can show actual jobs.
- Safety is part of the course: lithium-ion batteries, ESD protection, fume extraction during soldering and eye protection.
- The promises are realistic. Avoid courses that guarantee "a full trade in two weeks" or certain earnings.
- Find out what you get at the end: a certificate from the organiser, an officially recognised qualification, or just proof of attendance. Ask directly and get the answer in writing.
A staged practice plan
Stage 1. Safety, phone construction and documentation
Before your first teardown, learn the types of fasteners, flex cables and connectors, the order in which you disconnect power, the risks of a lithium-ion battery and the basics of ESD protection. Look up the procedure for each model: two phones that look alike can have their cables routed differently or open in a different way. General rules for working safely at the bench are in our article on safety rules for repair technicians.
If there is no procedure for the model, or the battery looks swollen or damaged, do not open the device and do not power it up without an experienced technician supervising.
Pass criterion: using the documentation, you can locate the battery connector, the fastening points and the opening sequence for a specific model and explain how to disconnect power.
Stage 2. Taking apart and reassembling a practice device
Work on your own phone or a scrap one, and record its condition before you start. Pick the exact screwdriver bit, lay screws out by area, photograph how the cables run, and never force a part that does not come away as the procedure describes. A tidy bench with good light and a phone holder cuts mistakes a lot; you will find some ideas in our guide to devices that make a repair bench easier to work at.
 Screwdriver set Mechanic iTech (48 in 1)out of stock›
Pass criterion: you take apart and reassemble the same device twice without damaging clips, cables or connectors, and after reassembly the function test gives the same result as before you started.
Stage 3. Basic multimeter measurements
Before you measure anything on a board, learn the meter's modes and how to plug in the test leads correctly, then check known values on a simple practice circuit. On an unpowered board, practise continuity and resistance checks only where the diagnostic procedure calls for them. Measure voltage at points and under conditions you have decided on in advance.
Never use the current range as if it were the voltage range: a wrong connection can cause a short circuit.
 Mechanic MiniTD MX digital multimeterout of stock›
Pass criterion: you choose the correct mode yourself, explain where the probes go, say beforehand what reading you expect, and can tell a measuring error from a real fault.
Stage 4. Soldering on practice boards
Start by tinning wires and large pads, then move on to fitting and removing easy-to-reach components on scrap boards. For each exercise, settle the right temperature, contact time, tip type, solder alloy and flux. Work with fume extraction switched on, on an ESD-safe surface, with safety glasses and a stable holder for the hot iron.
Do not judge a joint by its looks alone. Once it has cooled, inspect it under magnification, look for solder bridges and check the circuit for continuity. When you get to small components, magnification becomes essential; the differences between types are explained in our guide on choosing a microscope for repair work.
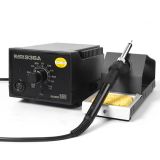 Soldering station QUICK 936A (200-480°C, 60W)53,78 $›
Pass criterion: a series of identical exercises gives repeatable joints with no overheated board, lifted pads, bridges or intermittent contacts.
Stage 5. Diagnosing by a fixed procedure
Diagnosis starts from the symptom and the device's condition on arrival. You form a hypothesis, choose one safe test, write down the result and only then decide on the next step. Swapping parts at random is not diagnosis.
- Record the model, condition, accessories and the reported symptom.
- Do a visual inspection with the power off.
- Check the obvious things: cable, charging port, battery, signs of liquid.
- List possible causes in the order you can check them without risk.
- Run one test and note the readings and conditions.
- Compare the result with what you expected and adjust the hypothesis.
Completion criterion: you work through the procedure on a practice fault, write down the expected result before each test and justify every next step with the data you collected.
Where to find reliable repair documentation
Videos help you see the hand movements, but they do not replace the manufacturer's procedure. Apple publishes free repair manuals on its support site as part of its Self Service Repair programme. In the European Union, Regulation (EU) 2023/1670 requires manufacturers, from 20 June 2025, to give professional repairers access to repair and maintenance information for phones placed on the market from that date. For components, the part maker's datasheet remains the reference.
When two sources disagree, trust the manufacturer's documentation and your own measurement, not the comments under a video.
What tools to buy first
For the first exercises you only need the tools your plan calls for: precision screwdrivers and plastic pry tools for disassembly, a multimeter for basic measurements, and a soldering station once you have a safe workspace and practice boards. Hold off on a microscope, a programmer or kit for modular repairs until your plan includes exercises for them and a way to check the result.
Keep a practice log
| Field | What to record |
|---|
| Exercise | The specific task and the practice device or board |
| Conditions | Tool, mode, materials and starting condition |
| Result | What happened, with readings and photos where useful |
| Deviation | What went wrong and the likely cause |
| Next step | What you will repeat or change next time |
The log shows where you are stuck and gives your mentor something concrete to correct. After a few weeks you can see clearly which exercises you pass consistently and which need another round.
Common beginner mistakes
- Buying lots of expensive tools before you know what exercises you will do.
- Working on a device without recording its starting condition.
- Forcing a part that will not come out instead of rechecking the procedure.
- Heating the board as much as possible "just to be sure".
- Copying values from a video without checking the model and the documentation.
When you are ready for customer devices
- You consistently meet the pass criteria for the first four stages.
- You have worked through the diagnostic procedure on several practice faults.
- An experienced technician has checked your work and signed you off.
- You do your first customer jobs under supervision, starting with simple ones such as a battery or charging port replacement.
If a step does not work out, go back to that exercise instead of moving on. Everyone progresses at a different pace; what matters is that the result is repeatable.

 UA
 RO








The information below is required for social login
Sign In
Create New Account