Useful information
Microscope: types, how to choose and what it is for the craftsman. — a practical article with explanations and recommendations for technicians, service centers, and users. It highlights the main points to consider when choosing, using, or repairing devices.
A microscope lets a repair technician see solder joints, connector pins, fine traces, corrosion and tiny SMD parts clearly enough to work on them. For hands-on board work, a sharp stereo image, enough working distance, a sensible field of view and a steady stand matter more than the biggest magnification figure in the listing. A camera and monitor are great for documenting jobs and training staff, but they do not always replace working through the eyepieces.
What a microscope does on a repair bench
With the naked eye or a basic magnifier it is easy to miss the details that decide whether a repair holds: a thin solder bridge between two pins, a joint that never wetted properly, a crack in the PCB or a trace lifted during an earlier repair. Under a microscope you can catch these faults before the board goes back into the housing.
It earns its place beyond soldering, too. Technicians use it to inspect connectors after cleaning, look for traces of liquid damage, check a new part before fitting it and examine the surface of a camera lens. Keep in mind that a visual check does not prove a circuit works. Anything suspicious still needs to be measured, following your shop's usual diagnostic routine.
Types of microscopes for electronics repair
| Type | Strength | What to check | Limitation |
|---|
| Monocular | Compact, with a single viewing path or a path for a camera, depending on the model | Viewing mode, field of view, working distance and ergonomics | No stereo image, so no real depth perception |
| Binocular stereo | Three-dimensional view for precise hand work | Diopter adjustment, interpupillary distance, zoom range and stand | No separate camera port |
| Trinocular stereo | Eyepieces plus a separate port for a camera | How light is split, the camera adapter and whether simultaneous viewing is possible | More parts that have to match each other |
| Digital (video) | Image straight on a screen, recording and demonstrations | Image lag, frame rate, working distance and stand | With a single camera, the flat image makes depth harder to judge |
Why a stereo image matters
When you solder or work with tweezers, you have to judge how high the iron tip sits above a component and its neighbours. A stereo microscope forms a separate image for each eye, and your brain merges them into one picture with depth. That makes it much easier for your hands to find their way in the space under the objective.
A digital microscope with one camera shows a two-dimensional image on the monitor. That works well for inspection, photos and showing a fault to a customer, but some technicians need time to adapt when they do fine soldering this way. Try it on your real everyday jobs before you give up on eyepieces.
Magnification, field of view and working distance
As magnification goes up, the field of view gets narrower and the depth of field gets shallower. During a repair you need to see the pin you are working on, the parts around it, where your tool is and which way it is moving. That is why a continuous zoom across a useful range is often worth more than a very high maximum magnification.
Working distance is the gap between the front of the objective and the board when the image is in focus. It has to leave room for the soldering iron, the hot air nozzle, tweezers and the board holder. An auxiliary objective lens changes magnification, field of view and working distance all at once, so judge these figures together.
Space under the objective matters most when the microscope sits next to a hot air station. If you are still choosing that part of the bench, our comparison of professional soldering stations covers what to look for.
Binocular or trinocular: how to decide
A binocular microscope suits technicians who spend most of their time looking through the eyepieces: soldering, placing components, cleaning pins. Check that each eyepiece has diopter adjustment and that the interpupillary distance can be set so the two images merge without strain.
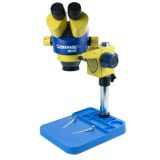 Binocular microscope Mechanic MC75S-B1 (7X-45X) with R16 illuminationout of stock›
A trinocular head adds a separate optical port for a camera. It helps when you record repairs, train new staff, ask a colleague for a second opinion or show the result to a customer. Before you buy, find out how the head splits light between the eyepieces and the camera, and whether you can use both at the same time.
The camera, adapter and monitor are not always included in the kit. Mounts, adapters and the video chain are explained in our guide to microscope accessories, so here we stick to choosing the microscope itself.
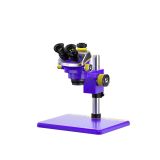 Trinocular microscope Mechanic MIC3-B11 (7-50X) with R16 illuminationout of stock›
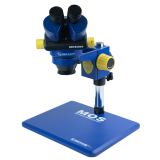 Trinocular microscope Mechanic MOS300-B11 (6X-45X) with R16 illuminationout of stock›
The stand and the focus mechanism
How steady the whole setup is has a direct effect on precision. Look at the weight of the base, the length of the arm, the load it is rated for, the diameter of the head mount and the focus travel. Once the camera and light are fitted, the stand has to hold everything without sagging or visible shake.
A long arm frees up room for boards and housings, but it needs a stiffer build. The base should not get in the way of your hands, the board holder or the ESD area. Because the stand sits close to heat sources, also think about where it goes relative to the hot air flow.
Eyepieces, diopters and your posture
The field of view of an eyepiece is listed separately from magnification. A wider field shows more of the work area at once. Diopter adjustment compensates for differences between your eyes, and interpupillary adjustment lets you merge both images into one.
Set the chair height, the position of the optical head and the eyepiece angle so you do not have to crane your neck forward. Before a long session, make sure the image is sharp for both eyes and that you can hold the same position without constantly shifting.
Lighting the work area
A ring light gives even illumination, but it can cause glare on solder and metal shields. Brightness control, a diffuser and the option to add side lighting all help. Mount the light so it does not block the optics or eat into working distance more than your process allows.
Checklist before you order
- List your tasks. Inspection, micro soldering, documentation and training each call for a different setup.
- Check the working distance. The board, holder and tools all have to fit under the objective.
- Judge the useful zoom range. At low magnification you should see the context, at high magnification the detail you need.
- Match the stand to the whole assembly. The head and accessories have to fit the mount and stay within the rated load.
- Confirm what is in the box. Eyepieces, an auxiliary lens, lighting, a camera and an adapter may be sold separately.
- Plan for upkeep. Find out whether light sources, power supplies, adapters and mechanical parts can be replaced.
Where the microscope fits in your workshop
A microscope stays on the bench for years, and how useful it is depends on everything around it: lighting, fume extraction, the board holder and how your tools are organised. If you are equipping a bench from scratch, see how each piece fits in our overview of core equipment for phone repair.
Bottom line
For most precise hand work, a technician needs a comfortable stereo image, enough room under the objective and solid mechanics. Choose the microscope around how your workshop actually works: binocular for daily soldering and inspection, trinocular when you also need a camera, digital for documentation and demonstrations.

 UA
 RO





The information below is required for social login
Sign In
Create New Account